| 编辑推荐: |
本文主要介绍了linux驱动入门之 设备树,设备树起源、基本概念介绍、dts基本框架及修改dts试验。希望对您的学习有所帮助。
本文来自于微信公众号车端,由火龙果软件alice编辑、推荐。 |
|
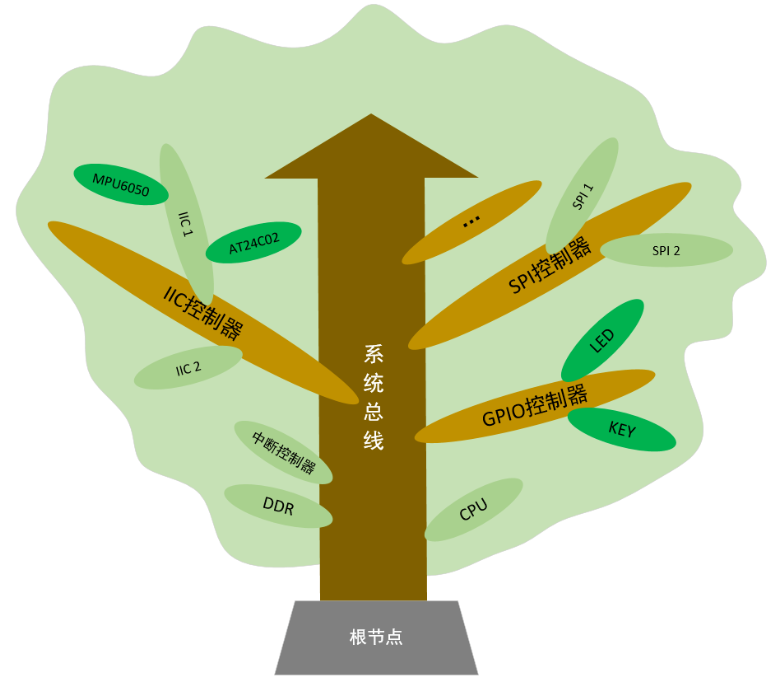
设备树(dts:device tree source),字面意思就是一块电路板上设备如上图中cpu、ddr、i2c、gpio、spi等,按照树形结构描绘成的一棵树。按照策略和功能分离的思路,就是驱动代码(功能)和设备树dts配置文件(策略)分开来进行设计,这样针对不同的电路板,linux驱动代码就不用动了,只需要改改dts就可以,dts中的配置会决定哪些驱动去运行。
linux相关知识在嵌入式领域中很重要,要学习可以找一个能运行linux代码的环境,最好有一个开发板,也可以用qemu在ubuntu上运行。
1.设备树起源
在linux 2.6中,arm架构的板极硬件细节过多地被硬编码在arch/arm/plat-xxx和arch/arm/mach-xxx中,如果外设发生相应的变化,那么驱动代码就需要改动。
2011年,linux之父linus torvalds发现这个问题后,就通过邮件向arm-linux开发社区发了一封邮件,不禁的发出了一句“this
whole arm thing is a f*cking pain in the ass”。之后,arm社区就引入了powerpc等架构已经采用的设备树(flattened
device tree)机制,将板级信息内容都从linux内核中分离开来,用一个专属的文件格式来描述,即现在的.dts文件。
从 3.x 版本之后开始支持使用设备树,这样做的意义重大,可以实现驱动代码与设备的硬件信息相互的隔离,减少了代码中的耦合性。通过设备树对硬件信息的抽象,驱动代码只要负责处理逻辑,而关于设备的具体信息存放到设备树文件中,这样,如果只是硬件接口信息的变化而没有驱动逻辑的变化,开发者只需要修改设备树文件信息,不需要改写驱动代码。
设备树由一系列被命名的节点(node)和属性(property)组成,而节点本身可包含子节点。在设备树中,可描述的信息包括:
cpu的数量和类别。
内存基地址和大小。
总线和桥。
外设连接。
中断控制器和中断使用情况。
gpio控制器和gpio使用情况。
时钟控制器和时钟使用情况。
基本上就是画一棵电路板上cpu、总线、设备组成的树,bootloader会将这棵树传递给内核,然后内核可以识别这棵树,并根据它展开出linux内核中的platform_device、i2c_client、spi_device等设备,而这些设备用到的内存、irq等资源,也被传递给了内核,内核会将这些资源绑定给展开的相应的设备。
2. 基本概念介绍 
2.1 dts
dts(device tree source设备树源文件)文件是一种ascii文本格式的设备树描述文件,此文件适合人类阅读,主要是给用户看的。
硬件的相应信息都会写在.dts为后缀的文件中,每一款硬件可以单独写一份xxxx.dts,一般在linux源码中存在大量的dts文件,对于
arm 架构可以在arch/arm/boot/dts找到相应的dts,另外mips则在arch/mips/boot/dts,powerpc在arch/powerpc/boot/dts。
对于imx6ull开发板
arch/arm/boot/dts/100ask_imx6ull_qemu.dts
dts中一般会包一个公共部分的dtsi文件,如下:
#include "imx6ull.dtsi"
2.2 dtsi
值得一提的是,对于一些相同的dts配置可以抽象到dtsi文件中,然后类似于 c 语言的方式可以include到dts文件中,对于imx6ull开发板arch/arm/boot/dts/imx6ull.dtsi
对于同一个节点的设置情况,dts中的配置会覆盖dtsi中的配置。具体如下图所示; 
2.3 dtc
dtc是编译dts的工具,可以在ubuntu系统上通过指令apt-get install device-tree-compiler安装dtc工具,不过在内核源码scripts/dtc路径下已经包含了dtc工具;
2.4 dtb
dtb(device tree blob),dts经过dtc编译之后会得到dtb文件,dtb通过bootloader引导程序加载到内核。所以bootloader需要支持设备树才行;kernel
也需要加入设备树的支持;
dtb文件布局如下: 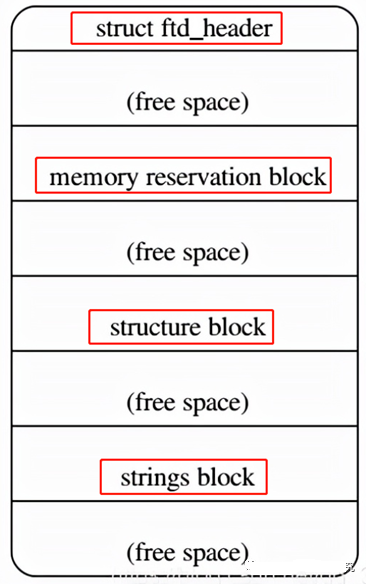
从上图可以看出,dtb文件主要包含四部分内容:
struct ftdheader:用来表明各个分部的偏移地址,整个文件的大小,版本号等;
memory reservation block:在设备树中使用/memreserve/ 定义的保留内存信息;
structure block:保存节点的信息,节点的结构;
strings block:保存属性的名字,单独作为字符串保存;
dtb文件代码级别的解析可以参考:
https://cloud.tencent.com/developer/article/1887823
(1) dtb 文件的结构图如下: 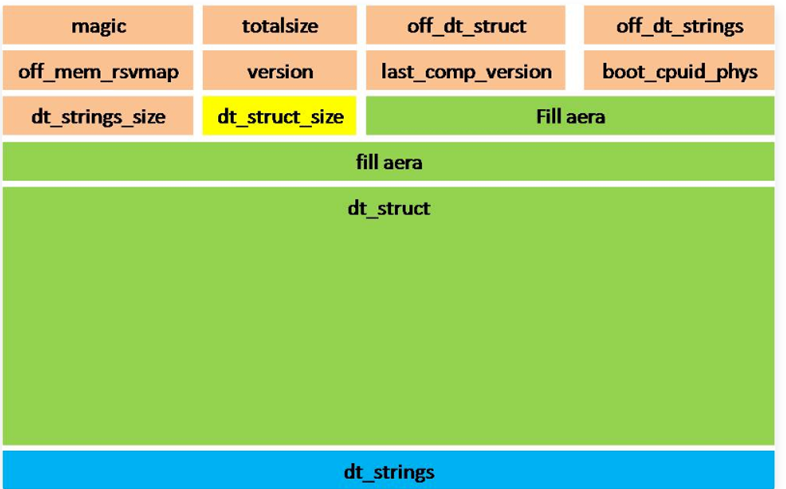
(2) 设备节点的结构图如下: 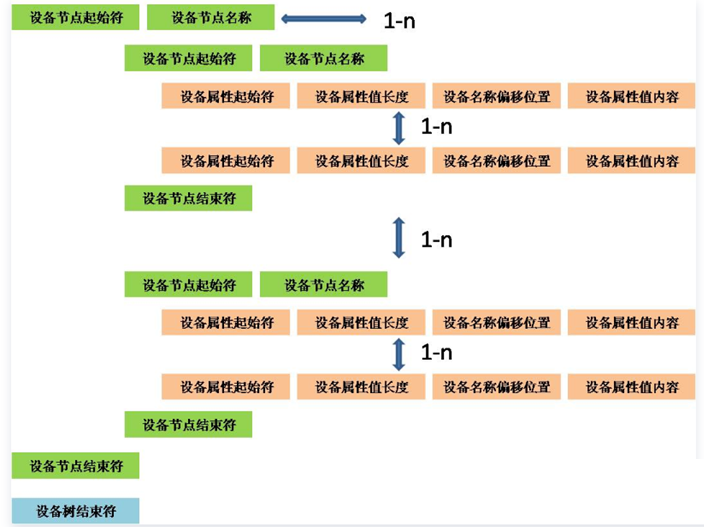
2.5 dtb加载及解析过程
u-boot处理如下: 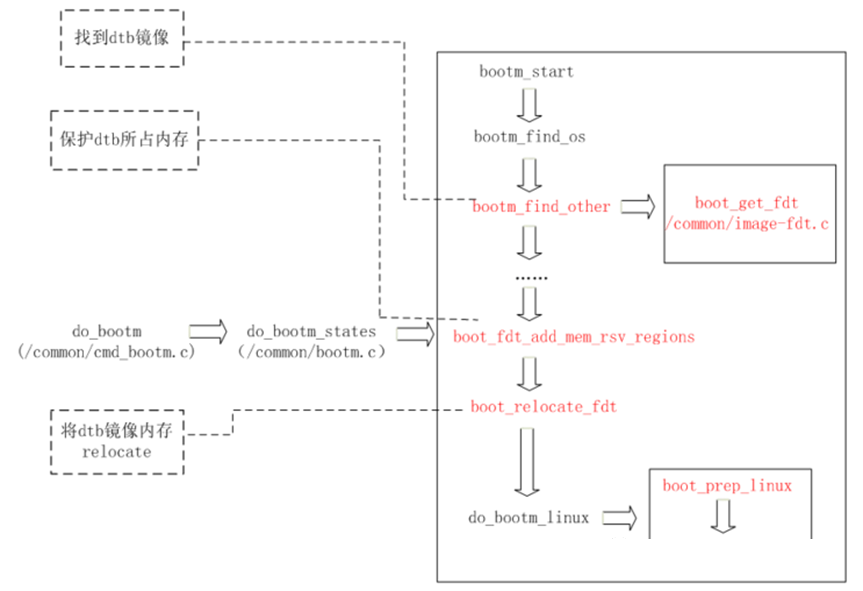
3. dts基本框架
下图是一个设备树文件的基本架构;大概看了一下有点类似于xml文件,简单概括一下有这几个部分; 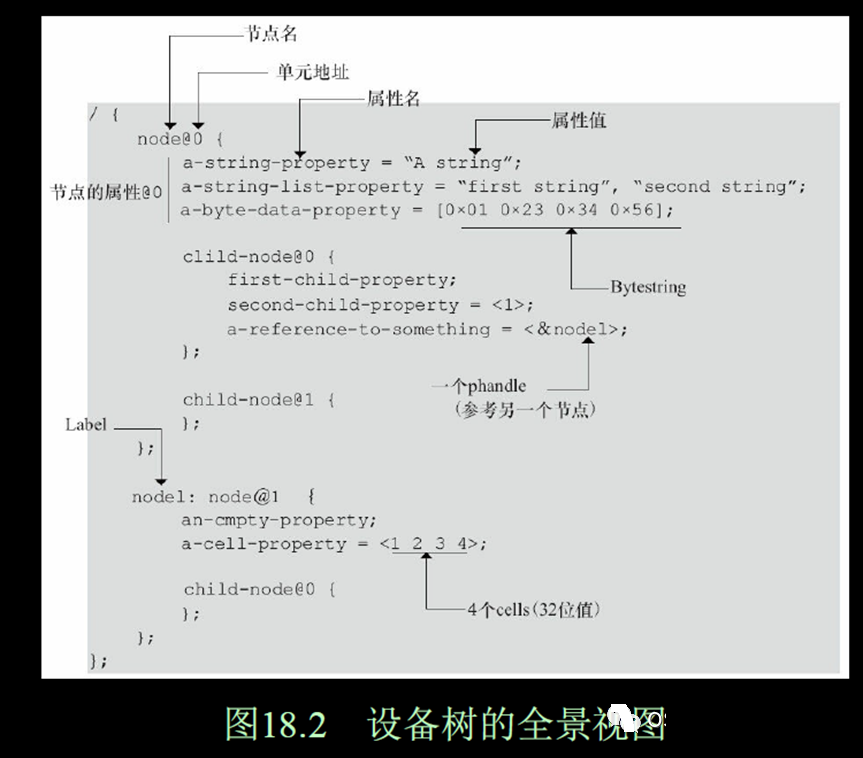
一个例子:
1 个双核arm cortex-a932 位处理器;arm 本地总线上的内存映射区域分布有
两个串口(分别位于0x101f1000和0x101f2000)
gpio控制器(位于0x101f3000)
spi控制器(位于0x10170000)
中断控制器(位于0x10140000)
外部总线桥上连接的设备如下:
smc smc91111以太网(位于0x10100000)
i2c控制器(位于0x10160000)
64mb nor flash(位于0x30000000)
外部总线桥上连接的 i2c 控制器所对应的 i2c 总线上又连接了maxim ds1338实时钟(i2c
地址为0x58)具体如下图所示; 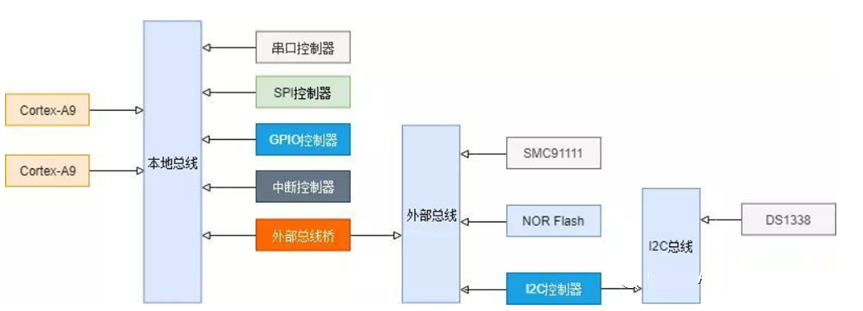
一个移植网卡的例子:
比如dm9000网卡,就需要首先将示例信息挂接到我们的板级设备树上,并根据芯片手册和电路原理图将相应的属性进行配置,再配置相应的驱动。需要注意的是,dm9000的地址线一般是接在片选线上的,所以设备树中就应该归属与相应片选线节点,我这里用的exynos4412,接在了bank1,所以是"<0x50000000
0x2 0x50000004 0x2>"
最终的配置结果是: 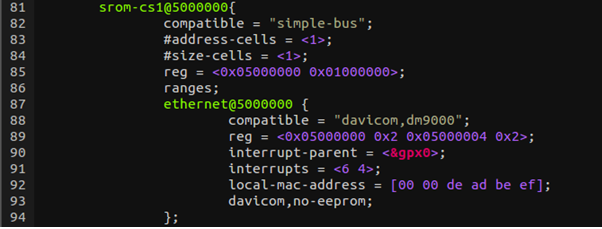
然后make menuconfig勾选相应的选项将dm9000的驱动编译进内核。
[*]
networking support ---> networking options
---> <*>
packet socket <*>unix
domain sockets [*] tcp/ip
networking [*] ip:
kernel level autoconfiguration
device drivers
---> [*] network device support
---> [*]
ethernet driver support (new) --->
<*>
dm9000 supportfile systems
---> [*] network
file systems (new) --->
<*> nfs client
support [*] nfs client
support for nfs version
3 [*] nfs client
support for the nfsv3 acl protocol
extension
[*] root file system on nfs |
执行make uimage;make dtbs,tftp下载,成功加载nfs根文件系统并进入系统,表示网卡移植成功
详细语法参考:https://www.cnblogs.com/xiaojiang1025/p/6131381.html
4. 修改dts试验 4.1 dts修改
修改设备树文件
arch/arm/boot/dts/100ask_imx6ull_qemu.dts,添加一个我们自己的模块dts_tree1: 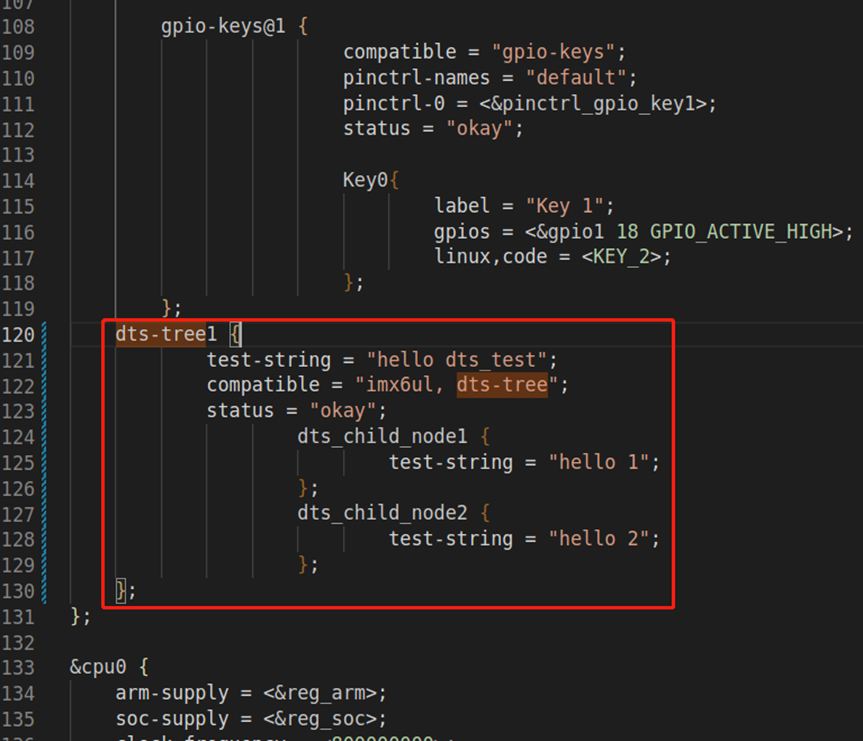
修改完成后执行make dtbs 重新编译设备树文件,编译完成后arch/arm/boot/dts/100ask_imx6ull_qemu.dtb,将其下载到芯片中。
或者用qemu运行的时候,修改参考指向这个新的dtb文件。
查看设备树节点进入内核,执行
我们会发现刚刚创建的设备树节已经存在了 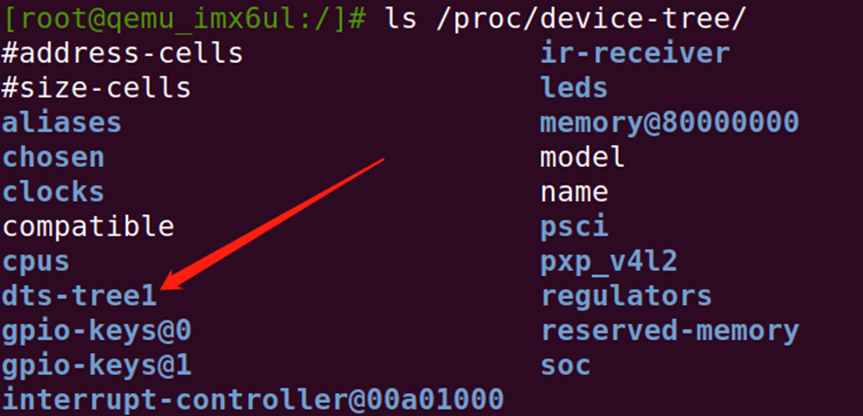
跟我们在dts里面修改的一样,这里变成了一个个的文件形式。文件的名字是属性的名字,内容是值。
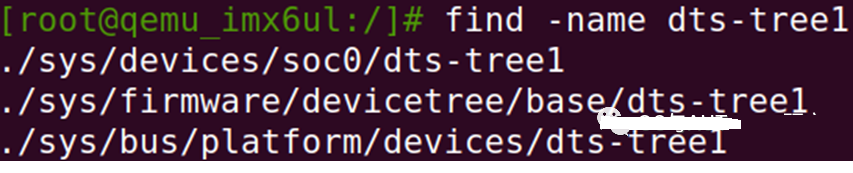
具体看看节点的内容,执行 
4.2 内核中添加驱动模块
参考:linux驱动实践:带你一步一步编译内核驱动程序 - iot物联网小镇 - 博客园
在/drivers文件夹下创建dts_test文件夹,然后创建kconfig文件
bash
config dts_test
tristate "dts test"
default y
help
this is the dts test
|
创建makefile文件
javascript
obj-$(config_dts_test) =
dts_test.o
|
在drivers文件夹下的kconfig和makefile文件中分别添加
c
source "drivers/dts_test/kconfig"
obj-$(config_dts_test) = dts_test/
|
创建dts_test.c文件
c
#include
#include
#include
#include
#include
#include
#include
#include
#include
#include
#include
#include
#include
#include
#include
#include
#include
#include
#include
#define driver_name "imx6ul,dts-tree"
static int devtree_probe(struct platform_device
* pdev)
{
struct fwnode_handle *child;
const char *p1,*p2[3];
u32 p3[2],value;
u8 testmac[6];
int i=0;
printk(kern_info "\n**********devtree_probe******************\n");
device_property_read_string(&pdev->dev,"test-string",&p1);
printk("devtree_probe node test-string
is: %s\n",p1);
device_property_read_string_array(&pdev->dev,
"test-strings", p2, 3);
printk("devtree_probe node test-strings
is: %s%s%s\n",p2[0],p2[1],p2[2]);
device_property_read_u32(&pdev->dev,"test-u32",&value);
printk("devtree_probe node test-u32 is:
<%d>\n",value);
device_property_read_u32_array(&pdev->dev,
"test-u32s", p3, 2);
printk("devtree_probe node test-u32s is:
<%d>,<%d>\n",p3[0],p3[1]);
device_property_read_string(&pdev->dev,"compatible",&p1);
printk("devtree_probe node compatible is:
%s\n",p1);
device_property_read_string(&pdev->dev,"status",&p1);
printk("devtree_probe node status is: %s\n",p1);
printk(" \n * devtree_probe child node
\n");
device_for_each_child_node(&pdev->dev,
child){
printk("*************childnode%d*************\n",i );
fwnode_property_read_string(child,"test-string",&p1);
printk("childnode test-string is: %s\n",p1);
fwnode_property_read_string_array(child,"test-strings",p2,3);
printk("childnode test-strings is: %s%s%s\n",p2[0],p2[1],p2[2]);
fwnode_property_read_u32_array(child,"test-u32",&value,1);
printk("childnode test-u32 is: <%d>\n",value);
fwnode_property_read_u32_array(child,"test-u32s",p3,2);
printk("childnode test-u32s is: <%d>,<%d>\n",p3[0],p3[1]);
fwnode_property_read_u8_array(child,"test-u8s",testmac,6);
printk("childnode test-u32s is: [%x,%x,%x,%x,%x,%x]\n",testmac[0],testmac[1],testmac[2],testmac[3],testmac[4],testmac[5]);
}
return 0;
}
static int devtree_remove(struct platform_device
* pdev)
{
printk(kern_info "devtree_remove\n");
return 0;
}
static const struct of_device_id of_devtree_dt_match[]
= {
{.compatible = driver_name},
{},
};
module_device_table(of,of_devtree_dt_match);
static struct platform_driver devtree_test_driver
= {
.probe = devtree_probe,
.remove = devtree_remove,
.driver = {
.name = driver_name,
.owner = this_module,
.of_match_table = of_devtree_dt_match,
},
};
static int devtree_test_init(void)
{
int num=0,i=0,value;
const char *p1;
struct device_node *node1,*childnode1;
u32 p2[2];
u8 testmac[6];
pr_warn(kern_info "^^^^^^^^^^^^^^^^^^^devtree_test_init^^^^^^^^^^^
\n");
printk(kern_info "^^^^^^^^^^^^^^^^^^^devtree_test_init^^^^^^^^^^^
\n");
printk("\n*************devtree init start
***************\n");
node1 = of_find_node_by_path("/dts-tree1");
if(node1 == null){
printk("of_find_node_by_path failed\n");
return -enodev;
}
else{
printk("of_find_node_by_path dts-tree1
ok\n");
}
//read string
of_property_read_string(node1, "test-string",
&p1);
printk("dts-tree1 node :test-string is:
%s\n",p1);
//read strings
num = of_property_count_strings(node1, "test-strings");
printk("dts-tree1 node test-strings num
is: %d\n",num);
for(i=0;i
of_property_read_string_index(node1,"test-strings",i,&p1);
printk("%s",p1);
}
//read string "compatible"
of_property_read_string(node1, "compatible",
&p1);
printk("dts-tree1 node compatible is: %s\n",p1);
//read string "status"
of_property_read_string(node1, "status",
&p1);
printk("dts-tree1 node status is: %s\n",p1);
//read u32 "test-u32"
of_property_read_u32(node1,"test-u32",&value);
printk("dts-tree1 node test-u32 is: <%d>\n",value);
//read u32s test-u32s
of_property_read_u32_array(node1, "test-u32s",
p2, 2);
printk("dts-tree1 node test-u32s is: <%d>,<%d>\n",p2[0],p2[1]);
//read u8s test-u8s
of_property_read_u8_array(node1, "test-u8s",
testmac, 6);
printk("dts-tree1 node test-u8s is: <%x>,<%x>,<%x>,<%x>,<%x>,<%x>\n",testmac[0],testmac[1],testmac[2],testmac[3],testmac[4],testmac[5]);
//get "dts_child_node1" device node
childnode1 = of_get_child_by_name(node1,"dts_child_node1");
if(childnode1 == null){
printk("of_get_child_by_name failed\n");
return -enodev;
}
printk("of_get_child_by_name dts_child_node1
ok\n");
of_property_read_string(childnode1, "test-string",
&p1);
printk("dts_child_node1 node test-string
is: %s\n",p1);
return platform_driver_register(&devtree_test_driver);
}
static void devtree_test_exit(void)
{
printk(kern_info "\ndevtree_test_exit\n");
platform_driver_unregister(&devtree_test_driver);
}
module_init(devtree_test_init);
module_exit(devtree_test_exit);
module_license("gpl");
module_author("zheng"); |
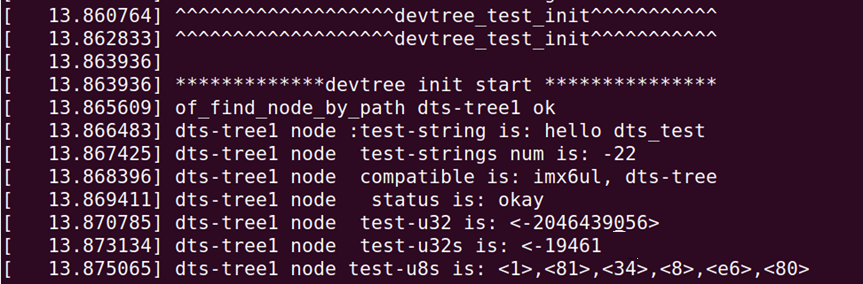
kconfig中是y,这样系编译运行后,会直接看到打印:
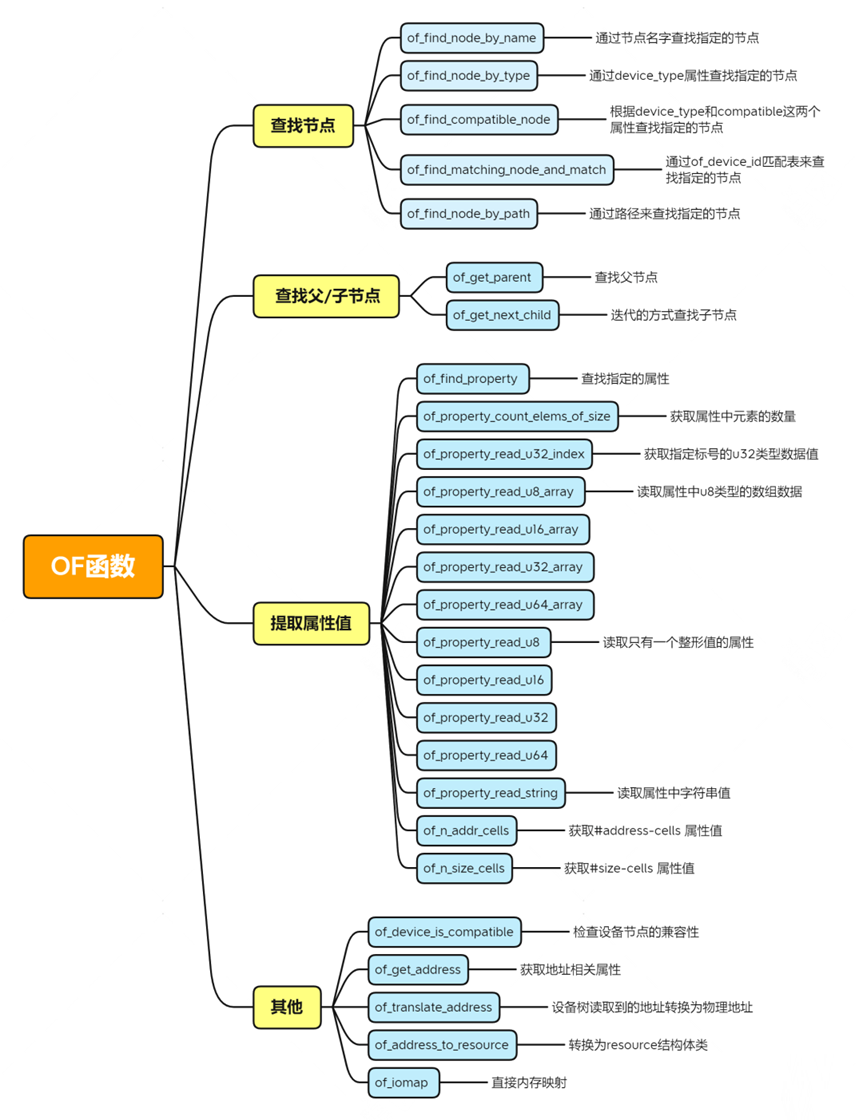
4.3 常用of api
linux 内核中和设备树相关的函数内核关于设备树的驱动都放在/drivers/of下,用户可以使用这里面的函数对设备树进行操作。
|